
Your ceiling goes through a lot. Years of settling, moisture, and the occasional bump leave their mark. And if you still have that bumpy popcorn texture from the ’70s or ’80s, you’re dealing with a surface that hides damage, collects dust, and instantly dates your home. The good news? You don’t have to tackle these problems one at a time.
Combining ceiling repairs, popcorn removal, and repainting into a single project is the smartest way to get a truly seamless finish. Not only does it save time and disruption, but it ensures every step is done in the right order, so your result actually lasts.
Here’s what that process looks like and why it matters.
Why You Can’t Skip Steps
Homeowners sometimes ask: “Can I just repaint the popcorn ceiling instead of removing it? Or can I patch the damage first and leave the texture as is?” You can, but you won’t get the result you’re hoping for.
Painting over a popcorn ceiling without removing it means the texture stays, along with all the dust, discolouration, and uneven surface that comes with it. And if your ceiling has any cracks, stains, or soft spots from water damage, painting over them without proper repair means those issues will show through your fresh coat within months.
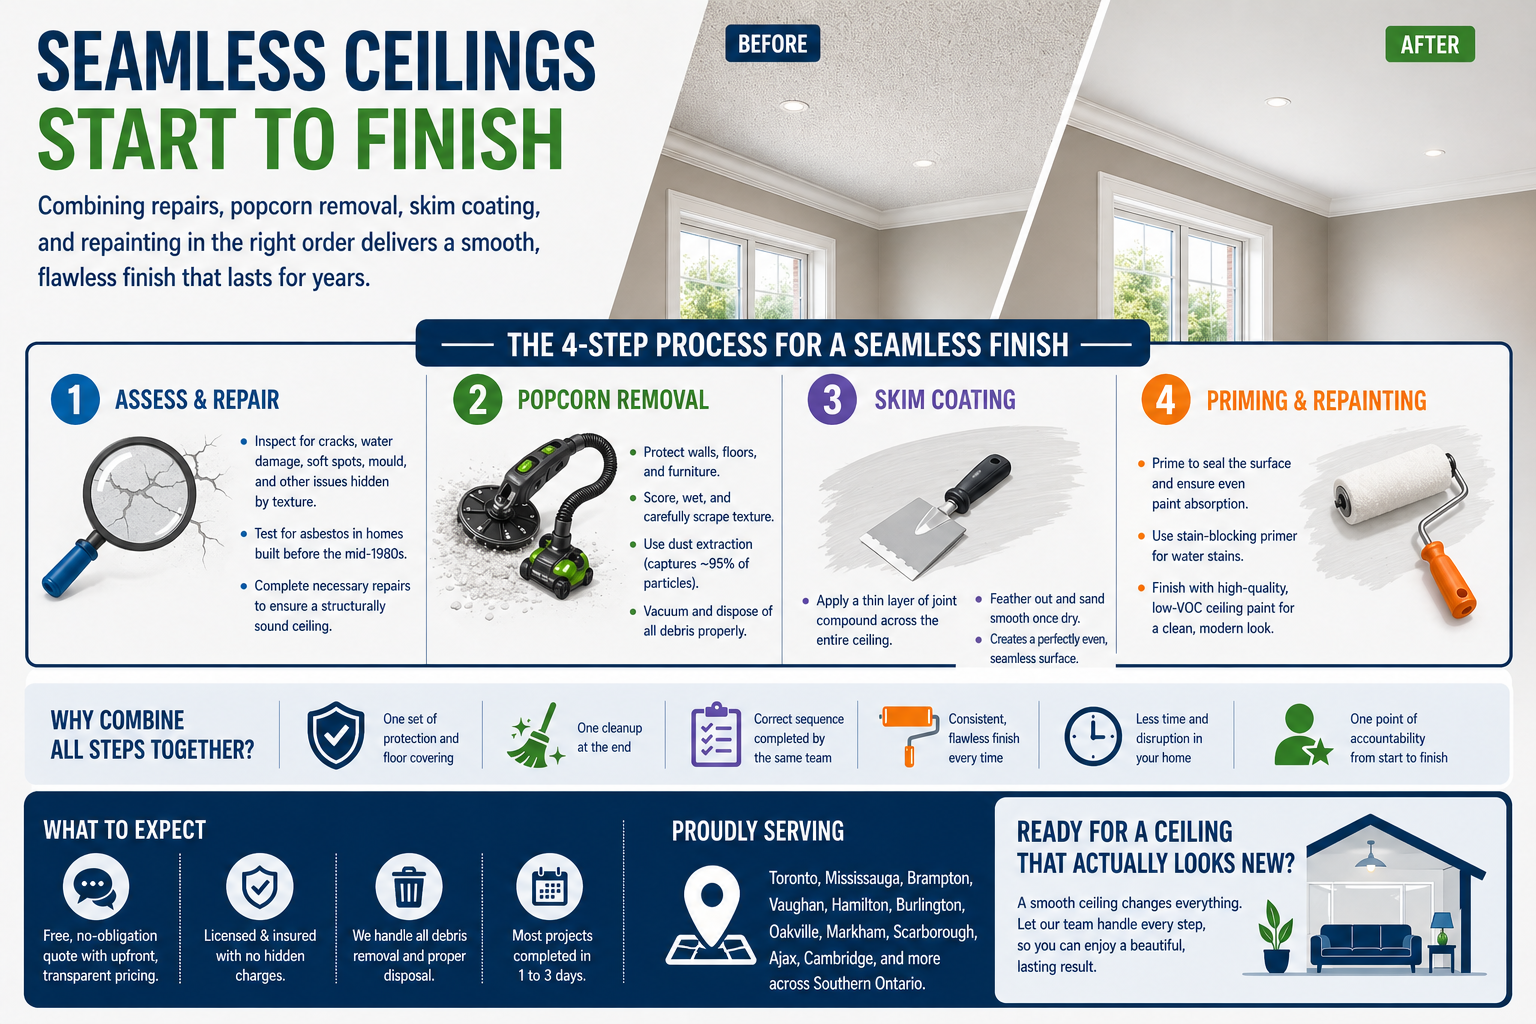
A seamless finish requires a specific sequence: assess and repair first, remove the popcorn second, skim coat to smooth the surface third, and then repaint. Skip or rush any of these steps, and you’ll notice. And so will anyone else who walks into the room.
Step 1: Assessing and Repairing the Ceiling First
Before anything comes off that ceiling, it needs to be assessed properly. Popcorn texture is notorious for hiding cracks, soft spots, water stains, and even mould. Once the texture is removed, any underlying damage becomes fully visible, and that’s when repairs occur.
Common issues found under popcorn ceilings include:
- Hairline cracks from the home settling over time
- Water stains from old or ongoing leaks
- Soft or crumbling drywall resulting from moisture damage
- Uneven joints or nail pops at the drywall seams
- Possible asbestos in homes built before the mid-1980s
If there’s any suspicion of asbestos, which is common in Ontario homes built before 1985, a professional sample and lab test is required before any removal work begins. At ByeByePopcorn, we follow Canadian safety regulations and will halt work and bring in a certified Asbestos Specialist if there’s any indication of contamination.
Once it’s confirmed that the surface is safe, repairs to cracks and damaged drywall are completed before or immediately after removal, depending on the extent of damage. Either way, the ceiling needs to be structurally sound before skim coating and painting can proceed.
Step 2: Popcorn Removal Done Right
Popcorn removal is messier than most people expect. The texture, whether sprayed-on compound or an older asbestos-era mix, doesn’t come off cleanly without the right equipment and technique. DIY attempts often result in gouged drywall, uneven surfaces, and damage exceeding the original issues.
At ByeByePopcorn, we use the Festool dust extraction system, which captures approximately 95% of particles during removal. That means significantly less dust in your home, less cleanup after, and a much safer environment. This is particularly important in older homes where disturbing ceiling materials can release harmful particles.
The removal process involves:
- Covering and protecting walls, floors, and furniture
- Carefully scoring and wetting the texture for easier release
- Scraping with purpose-built tools to avoid gouging the drywall
- Vacuuming and bagging all debris for proper disposal at your region’s waste management facility
Doing this properly leaves you with a clean, workable surface rather than a patchy, gouged mess that takes twice the effort to smooth out.
Step 3: Skim Coating for a Truly Smooth Surface
Even with careful removal, the drywall surface underneath won’t be perfectly smooth. Scraping always leaves minor imperfections such as small ridges, light grooves, and tool marks. This is where skim coating comes in, and it’s a step that separates a mediocre ceiling from a genuinely seamless one.
Skim coating involves applying a thin layer of joint compound across the entire ceiling surface, feathered out and sanded smooth once dry. Done well, it completely evens out the surface, fills minor damage, and creates the kind of flat, blank canvas that paint can actually highlight.
Skipping the skim coat, or doing it poorly, will show once the paint goes on. Light catches every imperfection on a freshly painted ceiling, especially with darker colours or glossier finishes. If you want the ceiling to look new, the skim coat needs to be done right.
Step 4: Priming and Repainting the Ceiling
A freshly skimmed ceiling still needs primer before paint, with no exceptions. Raw drywall compound is porous and will absorb paint unevenly, leaving a blotchy, dull result if you skip this step. A quality primer seals the surface, ensures even paint absorption, and gives you a consistent base for the topcoat.
If your ceiling had water stains, a stain-blocking primer is essential. Standard primer won’t stop those brown rings from bleeding through your paint. Stain-blocking products seal them out completely.
For the topcoat, flat ceiling paint is typically the right choice. It minimizes light reflection and keeps any remaining micro-imperfections from showing. If your ceiling is in excellent condition after skim coating, a low-sheen option can also work, depending on the room.
At ByeByePopcorn, we use high-quality, low-VOC paints to ensure a cleaner environment during and after the project. This is especially important for families with young children or anyone with sensitivities.
Why Doing It All Together Makes Sense
Every step in this process creates disruption: covering furniture and floors, dust, drying time, and cleanup. When you break the project into separate stages—repair now, removal later, painting months after—you’re multiplying that disruption and increasing the chance that earlier work gets damaged in the process.
Doing it all in one go means:
- One set of furniture protection and floor covering
- One cleanup at the end
- Each step is done in the correct sequence by the same team
- A consistent finish that wasn’t interrupted or compromised between stages
- Less time out of your space overall
It also gives you a single point of accountability. If anything isn’t right with the final result, you’re not trying to figure out which tradesperson to call. One team handled everything, and they stand behind the whole job.
What to Expect from the ByeByePopcorn Process
ByeByePopcorn handles the full scope, from initial assessment through to final paint, for homeowners across the Greater Toronto Area and Southern Ontario. Every project starts with a free, no-obligation quote so you know exactly what’s involved and what it will cost before we begin.
We’re licensed and insured, use upfront pricing with no hidden charges, and we handle all debris removal and proper disposal. Our team respects your home and leaves it cleaner than we found it.
Most standard residential projects are completed within one to three days. Larger projects or those requiring asbestos abatement take longer, and we’ll be upfront about that timeline from the start.
Ready for a Ceiling That Actually Looks New?
A smooth, freshly painted ceiling changes a room. It feels cleaner, brighter, and more modern, and it holds up far better than results from spot-patching or painting over texture. But to get there, the work has to be done properly and in the right order.
If you’re in Toronto, Mississauga, Brampton, Vaughan, Hamilton, or anywhere else across Southern Ontario, ByeByePopcorn is ready to handle the full project, from repairs and removal to skim coat and repaint, from start to seamless finish.
Book your free estimate today at byebyepopcorn.ca or call 844.2.BYE.BYE.
Frequently Asked Questions
-
Can I just repaint my popcorn ceiling instead of removing it?
You can, but it won’t solve the underlying issues. Paint won’t remove the texture, hide existing damage long-term, or modernize the look. Removal followed by skim coating and repainting delivers a far superior, longer-lasting result.
-
Do I need to fix ceiling cracks before or after popcorn removal?
Typically, after, it often reveals damage that wasn’t visible through the texture. Our team assesses the full scope of repairs once the surface is clear, then completes all repairs before skim coating begins.
-
How do I know if my popcorn ceiling has asbestos?
You can’t tell by looking. If your home was built before the mid-1980s, testing is strongly recommended. We collect a sample for lab analysis and follow all Canadian safety requirements if asbestos is found.
-
How long does the full process take?
For most standard residential rooms, the process takes one to three days. Larger spaces, heavily damaged ceilings, or projects requiring asbestos abatement will take longer. We provide a clear timeline during the initial quote.
-
Does ByeByePopcorn serve areas outside of Toronto?
Yes. We serve homeowners across the Greater Toronto Area and Southern Ontario, including Mississauga, Brampton, Vaughan, Burlington, Hamilton, Oakville, Markham, Scarborough, Ajax, Cambridge, and more.